Wednesday, January 22, 2014

A Website to Create a Favicon

When visiting a website, you can see its favicon like this below.


A favicon known as a shortcut icon, website icon, or bookmark icon is a mixed word using favorites and icon. Most of websites use the favicon. The reason is that the favicon makes the websites stand out and distinguish from other websites.  

Even if you make an image for the favicon in photshop, you need a converter to change the 
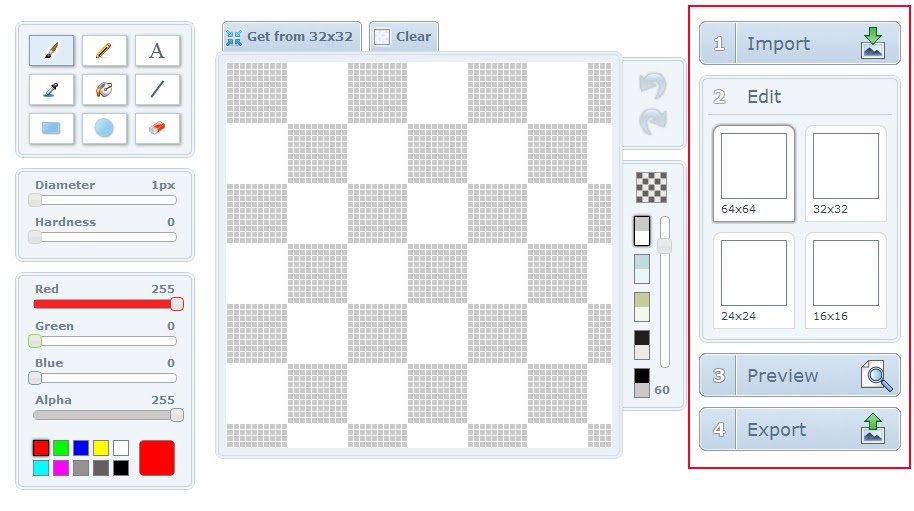
favicon file, favicon.ico. There is some software, but you can do that through a website without downloading software. You can just import and export your file from the website. I'll let you know one of websites for the favicon. Here it is: http://www.xiconeditor.com.

Most size of the favicon is 16 x 16 pixels, but you can make a bigger size at first. After then, when exporting a file, you select the size you want here. If you use this website, you can easily create your favicon. You just follow the step like this below.


Tuesday, January 21, 2014

How to Create a Snow Text Effect in Photoshop

Many graphic designers in winter create a snow text effect in Photoshop or in illustrator. The snow text effect in winter stands out. To create the snow text effect is simple. Here is the way to do that below.

1. Open a new file. My canvas size is 500 PX  by 300 PX.

2. Select Horizontal Type Tool in the toolbox, and write any text. I wrote SNOW. 


3. Click Add a layer style icon to SNOW text layer on the bottom in the Layers panel, and then select Bevel & Emboss. Set Structure and Shading in the Layer Style window like a image below. After then, click OK, and SNOW text will change.  


4. Create a new layer in the Layers panel, and set foreground color white in the toolbox. Choose Brush Tool in the toolbox, and then select Hard Mechanical 13 pixels in the control panel; you can select a different brush here. Draw snow on SNOW text like a image below. 


5.  Click Add a layer style icon to Layer 1 on the bottom in the Layers panel, and then select Bevel & Emboss. Set Structure and Shading in the Layer Style window like a image below. After then, click OK. 


6. You can see the snow text effect completed like a image below.


Tuesday, January 14, 2014

How to Create a Fog Effect in Photoshop

Using Photoshop, you might want to create a fog effect. The way to do that is simple. Follow steps below.

1. Open a file that you want to create a fog effect. I'm going to use a image below.


2. Create a new layer in the Layers panel. Set Default Foreground and Background Colors in the toolbox. Fill background color(white) to Layer 1; a hot key is Ctrl + D.


3. With highlighting Layer 1, select the Filter drop-down menu < Render < Different Clouds.


4. Click "Add layer mask" icon on the bottom in the Layers panel, and Layer 1 will change like a image below. After then, select the Filter drop-down menu < Render < Clouds.


5. With highlighting Layer 1 in the Layers panel, set Opacity to 35%. You can see the image foggy like this below.


6. Select the Image drop-down menu < Adjustments < Brightness/Contrast. Set Brightness to -49 like a image below. After then, click OK.


7. Choose Screen to Layer 1 in the Layers panel, and then set Opacity to 35% like a image below. You can see the image changed. That's it.


You can compare before and after below.


Monday, January 13, 2014

How to Create a Rain Effect in Photoshop

Last time, I explained how to create a snow effect. On the contrary to this, this time, I'm going to explain how to create a rain effect in Photoshop CS6. Here are steps below.

1. Open a file that you want to create a rain effect. I'm going to use this image below.


2. Create a new layer on the bottom on the Layers panel. Click Default Foreground and Background Colors in the toolbox. Set foreground color to black, and then fill it out on Layer 1; a hot key is Alt + D.


3. Select the Filter drop-down menu < Noise < Add Noise. Set Amount to 150%:  the more amount you set, the more rain you can make. Click Gaussian in Distribution and check out Monochromatic. After then, click OK.


4.  With highlighting Layer 1 on the Layers panel, choose the Filter drop-down menu < Blur < Motion Blur. Set Angle to 65 degrees and Distance to 35 pixels. After then, click OK.


5.  Select "Screen" on Layer 1 on the Layers panel like this below.


6. With highlighting Layer 1 on the Layers panel, select the Image drop-down menu < Adjustments < Levels. Set Input Levels on the Levels window like a image below: it depends on your image.


7. Create a new layer on the Layers panel. Select Gradient Tool in the toolbox and Linear Gradient on the control panel; choose Black, White on it. After then, drag it from top to bottom. 


8. If you do so, Layer 2 on the Layers panel will change like this below. With highlighting Layer 2, select Multiply and set Fill to 40%. 


After then, you can get a result like this below. 


 You can compare before and after below.


Friday, January 10, 2014

How to Create a Snow Effect in Photshop

Even though I don't like winter, I love snow. Whenever it snows, I try to take a picture. Even if it doesn't snow, I can make a snow effect in Photoshop. Here is a way to do that.

1. Open a file that you want to create a snow effect. I opened this photo below.


2. Create a new layer on the Layers panel: Shift + Ctrl + N. Select the Edit drop-down menu < Fill. Choose Black in the Fill window.


3. Select the Filter drop-down menu < Noise < Add Noise. Set Amount to 100%, select Uniform in Distribution, and check out Monochromatic in the Add Noise window. After then, click OK.


4. Choose the Filter drop-down menu < Other < Custom. Set figures like a image below in the Custom window. After then, click OK.


5. Select Rectangular Marquee Tool in the toolbox, and then drag it. Press Ctrl + T like a image below. After then, expand it as big as the whole canvas size.


6. Highlighting Layer 1 in the Layers panel, select Screen like a image below, and the image will have a snow effect like this below. However, you need to make snow look more natural.


7. Choose the Filter drop-down menu < Blur < Motion Blur. Set Angle to 68 degrees and Distance to 10 pixels; it depends on your photo. You will see a more natural snow effect on your photo.  


Here is an output. You can compare before and after below.


Thursday, January 9, 2014

Shazam - an Awesome Music Recognition Application

When listening to new or unfamiliar songs, I wonder the name of them. In this case, I usually use Shazam, a music recognition application. Shazam is really attractive because the way to use is simple - just touching to Shazam and it quickly lets me know the title of songs. Moreover, whenever I use Shazam, it gives me the exact information of the songs. This application is awesome.

If you have never used Shazam, I recommend you use it. I believe that you will love it. I'm going to link to the website of Shazam here: http://www.shazam.com.

Wednesday, January 8, 2014

How to Make a Reflection in Photoshop

You can often see some images or text reflected. A reflection makes images or text look different. I'll let you know how to make a reflection in Adobe Photoshop CS6 here.

1. Open a new file with a black background.

2. Using Horizontal Type Tool in the toolbox, type any text. I wrote "Reflect" here.


3. Duplicate the Reflect layer on the Layers panel, and the Reflect copy layer on it will be created like a image below.


4. With holding on the Shift key, using the arrow down key on your keyboard,  put down Reflect text. After then, with highlighting the Reflect copy layer on the Layers panel, choose the Edit drop-down menu < Transform < Flip Vertical. The direction of Reflect text will change like a image below.


5. Select Rasterize Type Layer in the Type drop-down menu.


6. Click "Add layer mask" icon on the bottom on the Layers panel.


7. Choose Gradient Tool in the toolbox, and select Linear Gradient on the control panel: click the third one - Black, White. After then, set Opacity on the Layers panel to 27%; it depends on you in order to adjust Opacity.


8. Holding on the Shift key, drag it from down to up like a image below. That's it.


Here is an output below.


When you use an image to make a reflection, it is the same process as text above.

Tuesday, January 7, 2014

How to Use Adobe Creative Cloud and CS6

The latest version of Adobe is Creative Cloud. If you visit this website, you can watch more video lectures of Adobe Creative Cloud and CS6: http://tv.adobe.com/channel/how-to/how-to-cs6-tutorials.


Monday, January 6, 2014

How to Use Adobe Dreamweaver CS6

If you want to know how to use Adobe Dreamweaver CS6, I'm going to link to the website. Here is the video lecture of Adobe Dreamweaver CS6: http://tv.adobe.com/show/learn-dreamweaver-cs6.


Sunday, January 5, 2014

How to Use Adobe After Effects CS6

If you want to make your videos look more attractive, you should learn Adobe After Effects. Here is the video lecture of Adobe After Effects CS6: http://tv.adobe.com/show/learn-after-effects-cs6.


Saturday, January 4, 2014

How to Use Adobe Premiere Pro CS6

Many users upload their videos online, using various video editing programs. Among them, if you want to know how to use Adobe Premiere Pro CS6, I'm going to link to the website. Here is the video lecture of Adobe Premiere Pro CS6: http://tv.adobe.com/show/learn-premiere-pro-cs6.